Contents
2. EGit Installation for Eclipse
3. Setting up EGit
4. Working with a local Git repository
4.1 Creating an Eclipse project
4.2 Create local Git repository
4.3 Track Changes
4.4 Inspecting the state of the Repository
5. EGit History View
6. Repository View
7. Cloning Remote Repositories
8. Performing Git operations
8.1 Basic operations
8.2 Amending Commits
9. Branching
9.1 Creating a New or Checking out an existing Branch
9.2 Renaming an Existing Branch
10. Merging
10.1 Merge
10.2 Solving merge conflicts
11. Rebasing
12. Commit Operations
12. 1. Resetting your current HEAD
1. EGit Overview:
EGit is an Eclipse plug-in which allows user to use the Git directly within the Eclipse IDE.
For more Details on Git see Git Tutorial.
You can install it via the Eclipse installation manager. Start this manager via the Help -> Install new Software menu entry. Use following link: http://download.eclipse.org/egit/updates

Every commit in EGit will include the user’s name and his email-address. These attributes can be set in the Preferences, to set it select Window -> Preferences -> Git -> Configuration.
You can add entries to your Git configuration by pressing the Add Entries button on the Git Configuration preference page. To add your user, use the user.name as key and your real name as value. Do same for your email address.

You can also configure in Eclipse the default folder for storing Git repositories via the Window -> Preferences -> Git -> Team -> Default Repository Folder entry.

Create a new Java project called com.test.git.hello in Eclipse. Create the com.test.git.hello package. Add one sample class like following.
package com.test.git.hello;

public class TestGit {
  public static void main(String[] args) {
    System.out.println("Hello Git");
  }
}
4.2 Create local Git repository
Select the project, click File -> Team -> Share Project.
Select repository type Git and click Next.

On the next dialog press the Create button.

It is recommended to place your Git repositories outside the Eclipse workspace.
After pressing the Finish button in create dialog, the wizard displays the settings for your local Git repository. Select the Finish button again to put your repository under Git version control.

You have created a local Git repository. The Git repository is in this case directly stored in the specified folder in a .git folder.

A. Create .gitignore file: A gitignore file specifies intentionally untracked files that Git should ignore. Files already tracked by Git are not affected.
Creating a file .gitignore in the project folder with the following content:
bin
.metadata
All files and directories which apply to the pattern described in this file will be ignored by Git. In this example all files in the bin and the .metadata directory will be ignored.
B. Git Staging view: This view provides an equivalent for git status showing changes made in the working tree. Unstaged changes which have not yet been transferred to the git index are displayed in the Unstaged Changes pane, changes which have already been "added" (staged) to the Git index are shown in the Staged Changes pane.
Open the Git Staging view via the Window -> Show View -> Other... -> Git -> Git Staging menu.
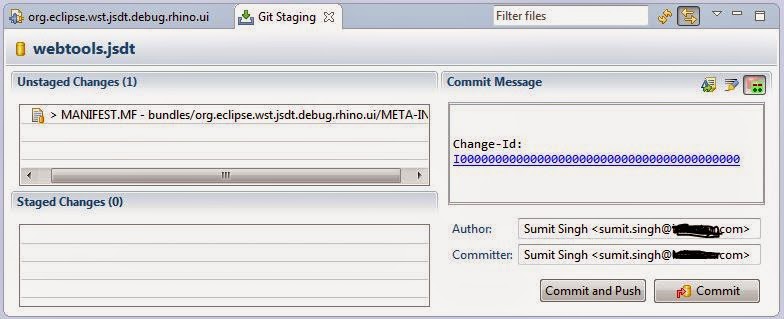
C. Committing changes using the Staging view: Using the Git Staging view drag only the all files you want to commit into the Staged Changes area, write a meaningful commit message and press the commit button.

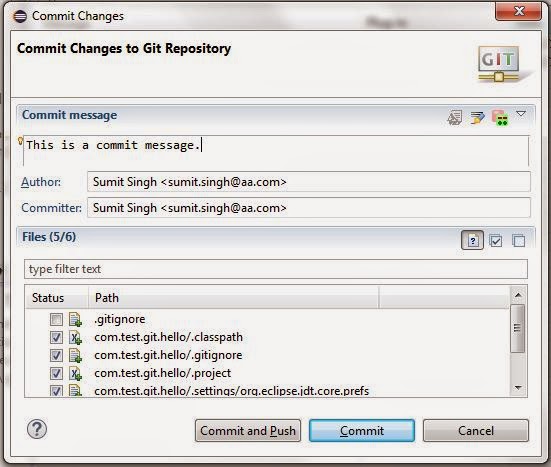
D. Git commit dialog: EGit has a Commit dialog, you can open it directly via selecting the Team -> Commit dialog.
This dialog allows you to add changed and new files to the staging area and commit the changes.
4.4 Inspecting the state of the Repository:
The Package Explorer view shows indicators on the files to show their status. The most important icon decorators are depicted in the following screenshot.

- dirty (folder) - At least one file below the folder is dirty; that means that it has changes in the working tree that are neither in the index nor in the repository.
- tracked - The resource is known to the Git repository and hence under version control.
- untracked - The resource is not known to the Git repository and will not be version controlled until it is explicitly added.
- ignored - The resource is ignored by the Git team provider. The preference settings under Team -> Ignored Resources, "derived" flag and settings from .gitignore files are taken into account.
- dirty - The resource has changes in the working tree that are neither in the index nor in the repository.
- staged - The resource has changes which have been added to the index. Note that adding changes to the index is currently possible only in the commit dialog via the context menu of a resource.
- partially-staged - The resource has changes which are added to the index and additional changes in the working tree that neither reached the index nor have been committed to the repository. See partial staging from the Git Staging view for how to do that.
- added - The resource has not yet reached any commit in the repository but has been freshly added to the Git repository in order to be tracked in future.
- removed - The resource is staged for removal from the Git repository.
- conflict - A merge conflict exists for the file.
- assume-valid - The resource has the "assume unchanged" flag. This means that Git stops checking the working tree files for possible modifications, so you need to manually unset the bit to tell Git when you change the working tree file.
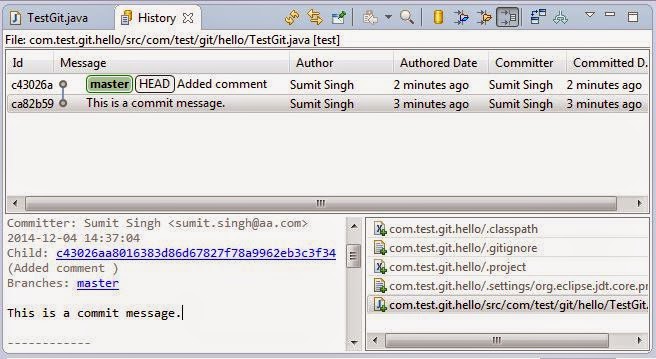
To analyze the contents of a specific commit we use the History View which supports this task much better.
To see the history of a resource, select your project, a file or a folder, right-click on it and select the Show in -> History context menu entry. Alternative you can use the Alt+Shift+W shortcut and select the History entry.
6. Repository View
EGit has a Git repository view which allow you to browse your repositories, clone your Git repositories, checkout projects, manage your branches... etc.
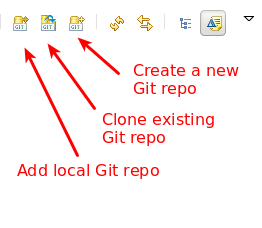
A. ToolBar: The toolbar entries allow you to add an existing local Git repository to the view, clone a Git repository and to create a new Git repository.
B Content Area: The content area show the existing Git repositories and the structural elements of this view. The following screenshot highlights the different main elements of this view.

A right-click (context menu) on an element in the Git repository view allows you to perform related Git operations.

7. Cloning Remote Repositories
Using the Git Clone Wizard you may clone remote repositories using different transport protocols.
The wizard can be started from the "Import Projects from Git" wizard using
File -> Import... -> Git -> Projects from Git -> Next -> Clone URI -> Next
or from the "Git Repositories View" (described above in Repository View) using the Clone a Git Repository toolbar button or view menu.
A: Repository Selection: On the first page of the wizard enter the location of the remote repository.

- URI - The complete URI of the remote repository or the path on the file system. This field is automatically synchronized with the other fields. Note: that you can use the Local file... button to browse for a local directory and that the URI field offers content assist by offering previously used values
- Host - The name of the remote host or empty if cloning from the file system.
- Repository Path - Path to the remote repository or on the file system.
- Protocol - One of the protocols described below.
- Port - Port number.
- User - The user name used for authentication.
- Password The password used for authentication.
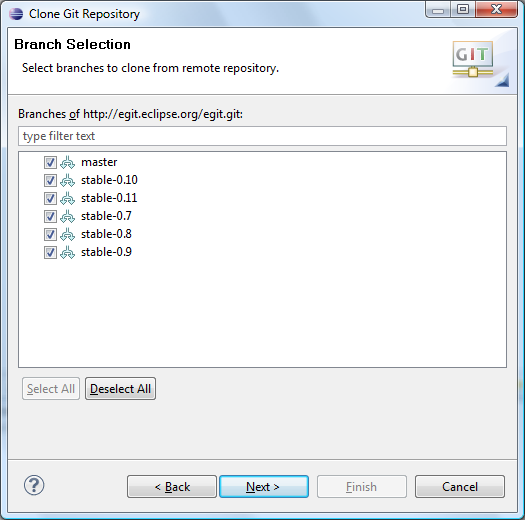
B. Branch Selection: On the next page choose which branches shall be cloned from the remote repository.
C. Local Destination: On the next page define where you want to store the repository on the local file system and define some initial settings.

- Directory - The directory which will contain the Git repository. It will be created by the wizard if it does not yet exist.
- Initial branch - Choose here which local branch will be created and initially checked out.
- Remote name - Define a name for the remote repository. The default is "origin"
8. Performing Git operations
8.1 Basic operations
Once you have placed a project under version control you can start using team operations on your project. The team operations are available via right-click on your project or file.

The most important operations are described in the following list. Select:
- Team -> Add to index, to add the selected resource(s) to the index of Git
- Team -> Commit, to open the commit dialog for committing to your Git repository
- Team -> Create Patch..., to create a patch
- Team -> Apply Patch..., to apply a patch to your file system
- Team -> Ignore, to add the file to a .gitignore file
- Team -> Show in History, to display the selected files and folders in the History view
- Team -> Pull to pull in changes from your remote Git repository
- Team -> Fetch to fetch the current state from the remote repository
- Team -> Switch To to switch or create new branches.
- Team -> Push to push changes to your remote Git repository
- Team -> Tag to create and manage tags.
8.2 Amending Commits
If you recognize that you missed something when committing a change you may fix this: open the staging view or commit dialog again and specify that the current commit shall "amend" the previous commit in the current branch. The new commit will then replace the previous one. This feature is often used to correct incorrect commits before they are published to other repositories.
Note: do not amend commits if they have already been published to a shared repository since this may disturb others if they already based their changes on the published change.

9. Branching
9.1 Creating a New or Checking out an existing Branch
Right-click your project and select Team -> Switch To to create new branches or to switch between existing branches.

9.2 Renaming an Existing Branch
A. From the Team menu on a Project node:
- Select Team -> Advanced -> Rename Branch...
- On the branch selection dialog, select the branch to rename.
- Enter the new branch name and click OK.
B. From the Repositories View:
- Open the Git Repositories View.
- Select Rename Branch... or press F2 on the branch you want to rename.
- Enter the new branch name and click OK.
C. From the History View:
- Select Rename Branch... on a commit with a branch label.
- Enter the new branch name and click Ok
9.3 Deleting a Branch
All the actions below show the same behavior with respect to the following:
- The currently checked out branch can not be deleted
- If deletion of the branch may result in data loss, a warning is displayed that must be confirmed
- EGit assumes a potential data loss if the branch points to a commit that is not reachable from the currently checked out commit
From the Team Menu on a Project node
- Select Team -> Advanced -> Delete Branch...
- Select the branch to delete from the dialog being displayed and press Ok
From the Repositories View
- Open the Git Repositories View
- Select Delete Branch on the branch you want to delete
From the History View
- Select Delete Branch on a commit with a branch label
- If multiple branches point to the commit, a selection dialog will be shown on which you can select the branches to delete
10. Merging A merge include changes from another branch or tag, since the time their histories diverged from the current branch, into the currently checked out branch.
10.1 Merge: EGit supports merging of branches to add the changes of one branch into another. Select your project and Team -> Merge to start the merge dialog.

10.2 Solving merge conflicts:
A merge can result in conflicts which require user action. This is the case when the content of files cannot be merged automatically. These conflicts are marked with a label decoration in the Staging View. Using the Staging View to find the files with conflicts in order to resolve them is handy since the Staging View shows only modified files so that you don't have to wade through all of your resources but only those which might need your attention for resolving the conflicts.

Also the conflicting resources are decorated in the navigation trees like Project Explorer or Package Explorer views

The merge conflicts in the content of files are presented with textual conflict markers (see: http://www.kernel.org/pub/software/scm/git/docs/git-merge.html#_how_conflicts_are_presented for more details)
A. Using Merge Tool:
- select the top level resource showing the red conflict label decorator.
- click Team -> Merge Tool
- select the merge mode Use HEAD (the last local version) of conflicting files and click OK

- the merge editor opens showing the working tree version in the left pane and the version to be merged in the right pane

- edit the working tree version until you are happy with it
- Team -> Add the merged resource to mark the conflict as resolved
- commit the merge commit via Team -> Commit
B. Manual conflict resolution: To resolve a conflict you have to do the following steps:
- Navigate to the conflicting resource
- Edit the content of the conflicting resource
- Tell EGit that the conflict is resolved with Team -> Add
- Commit the conflict resolution with Team -> Commit
C. Finding conflicting files: A repository which contains conflicting files has the textual label decorator "|Conflicts" attached to the repository name. Conflicting resources and folders containing such conflicting resources get a conflict label decoration.

Alternatively, it's easy to find a list of all conflicting files in the staging area. Open the Git Staging view. The conflicting files with decorators will be seen on the left.

D. Adding conflict resolution to the git index: Once you are finished with editing a file either click Add to Index in the Staging View or click Team -> Add to add the conflict resolution to the git index. This will also mark the corresponding conflict as resolved.
When you have resolved all conflicts the textual repository label decoration changes to "Merged". There are no conflict markers anymore.

E. Committing a merge: When the repository is in state "Merged" (as is indicated with the textual label decorator "|Conflicts" attached to the repository name) the merge can finally be committed.
In the Staging View you may want to remove the conflict remarks from the standard merge commit message which is generated by the merge operation and update the commit message if necessary. Then click Commit in order to commit the conflict resolution.

F. Aborting Merge: If a merge resulted in conflicts you can abort the merge with a hard reset to the current branch. This can be done in state "Conflicts" and in state "Merged", i.e. before and after you have resolved the conflicts..
11. Rebasing
The Git Repositories view allows you to rebase your currently checkout branch onto another branch. Right-click on a repository node and select Rebase as depicted in the following screenshot.

In the following dialog you can select the branch onto which you want to rebase.

If the rebase was successful a dialog is shown. You have to resolve rebase conflicts if they occur. After resolving them, select Rebase -> Continue or if you want to cancel the rebase operation select Rebase -> Skip and Rebase -> Abort.
12. Commit Operations
12. 1. Resetting your current HEAD: Git offers the possibility to reset the HEAD of the current branch to any other commit. It optionally resets the index and the working tree to match that commit. Note: that this action affects all files and folders in the entire repository.
The History view allows you to reset your current branch to a commit. Right-click on a certain commit and select Reset and the reset mode you would like to use.

You have the option to do a hard reset, a mixed reset and a soft reset.
- soft - the HEAD points now to the new commit, the index and the working tree are unchanged.
- mixed - the HEAD points now to the new commit, the index is updated, the working tree is unchanged.
- hard - the HEAD points now to the new commit, the index and the working tree are updated
A. Reset to specific branch or tag: Select Team -> Reset... on a project. This opens a dialog where you can select a branch or a tag.
B. Reveart all local and staged changes: This can be done using a hard reset. If you reset to the current HEAD (normally the last commit on your branch) with the option hard you reset the currently checked out branch to this commit and overwrite the working tree and the index with the content of HEAD. You can do this in three ways:
- Select Team -> Reset... on a project. In the dialog select HEAD or your current branch and switch the radio button to hard.
- Right click and select Reset... on any branch or tag in the Repositories view. This opens a dialog which lets you decide on the reset type. Choose hard here.
- Open the context menu on the HEAD commit in the history view and select Hard Reset.